Rust Sleeps for No One!
Tackling Rust Removal on the Budget Time Attack Evo
You can try and ignore it; pretend it’s not there. Maybe you do a quick hack job and tell yourself it’s actually gone. But unfortunately, rust will come back to haunt you. When I bought my 1999 Mitsubishi Evo VI GSR back in early 2015, rust removal was the last thing on my mind.
Sure, the car had some exterior war wounds, but the price seemed to take that into account. And little did I know that the transfer case would go within the first month… or that the head gasket was blown! No, none of that mattered at the time. I was finally about to own my first AWD manual turbo beast of a car. It quickly became my pride and joy; an addiction that consumed every bit of spare time and idle thought. There was so much to be done on my Mitsubishi Evo. And so, for the next 4 years, I spent hundreds of hours adding more power, a new ECU, rebuilding the engine, and even installing a Playstation 2 into the glovebox!
Then, back in September of 2017, I decided to park the car for another cold Canadian winter. At the time, I figured I would do the usual winter work on the car. You know, pull the engine, delete the power steering and ABS systems, completely rewire the car, and repaint the engine bay. Pretty standard, really. Even by the following spring, it seemed like I was on track to have the car ready for the summer. That is until I looked under the car.
Sure, we all look under our cars at some point. Hell, by this point, I had done the brakes, tie rods, and exhaust, just to name a few. I had looked under the car more than enough times. This time, however, I actually looked under the car and acknowledged the inevitable. The rust was there, in clear view. I had never really noticed it like I did this time. Maybe that’s because I had finally decided the car was going to be a part of the family for a long time. Or maybe it’s because the light was shining in just the right way. But either way, something had to be done about it.

An example of the rust underneath the Evo.
Now I’ve seen pictures and videos of horrible rust on cars, and I can honestly say mine was nowhere near that bad. Regardless, I wanted this car to last another 10 years or more, so preventative action was required. The worst was on the spare wheel well, but I already had plans to cut that out and weld in a flat trunk floor. Now luckily, the rust had not made its way entirely through the metal. In fact, for the most part, it seemed to be limited to the surface with some light pitting in a few spots. But nonetheless, I couldn’t just leave it there. So, having finally decided what I had to do, I started to strip everything out from under the car: the brake lines, the fuel tank, and all of the suspension. All that was left was the rust, staring at me, taunting me. Out came the wire brush, the angle grinder, and a plethora of sandpapers.

An hour of wire brushing and sanding underneath the car; not a very pleasant experience.
Working under a car on jack stands is no fun. I dread even touching suspension parts as I know a clump of gravel and dust will make its way into my mouth, nose, eyes, and ears. And what’s the deal with creepers? I mean, I can barely fit myself under the car, let alone have some creeper under me that gets caught on that missing 10 mm socket. Not to mention the useless headrest that places your face a mere inch or 2 from the driveshaft. I tried to make it easier for myself. I even went out and bought new 6-ton jack stands just so I could lift the car another 10 inches. But in the end, I was still left with dust in every nook of my body. Trying to wire brush or angle grind under the car made the experience all the more painful and frustrating. Your arms would either fall asleep or get sore before you could move on to the next patch of rust. After spending several hours going at the underside, I realized that I was likely going to go insane before I finished removing the rust.

The rust caked on to the fuel filler neck. A common issue on Evos.
Quickly, I started to contemplate my options. I could take the car to an auto body shop and have them remove the rust. But unfortunately, I didn’t feel like shelling out thousands of dollars to do that. Another option would have been to put the suspension back on and tow the car to a sandblasting site. But this still involved quite a bit of planning, and cost.
I then started to think of other options that could be done in my own garage. I had at this point seen several articles about people using car rotisseries to flip their cars over and restore the underside. But a quick search of the internet found that to still be a relatively expensive option. Keeping in mind I wanted to spend more money on the performance of the car, I decided it would be best to find a cheaper option. I then stumbled upon several videos on Youtube of what I can only describe as a redneck solution to my problem. They involved 2x4s, plywood, and some clever construction to make a DIY rotisserie. Now I had an idea. If I could build one of these and rotate the car 90 degrees, I would finally be able to remove the rust without it falling on my face, and my arms would no longer ache every time I held the angle grinder above my head.
Now luckily for me, my current day time job involves timber frame structures, and because of this, I had access to off cuts and scraps of wood. So, I headed into the factory and collected up some scraps of glue laminated spruce (Glulam) and cross laminated timber (CLT). These pieces of wood were definitely overkill for what I needed (Glulam and CLT are typically used for structural applications due to their strength) but given that they were free scraps, I wasn’t about to complain. With a little model sketched up on a piece of paper, I set about constructing the two frames that would support the car. The goal was to attach them at each end with bolts near the frame rails. After several hours of cutting and drilling, screwing together, and a few minor mistakes (measure once, cut twice!), I finally had my frames ready to go.

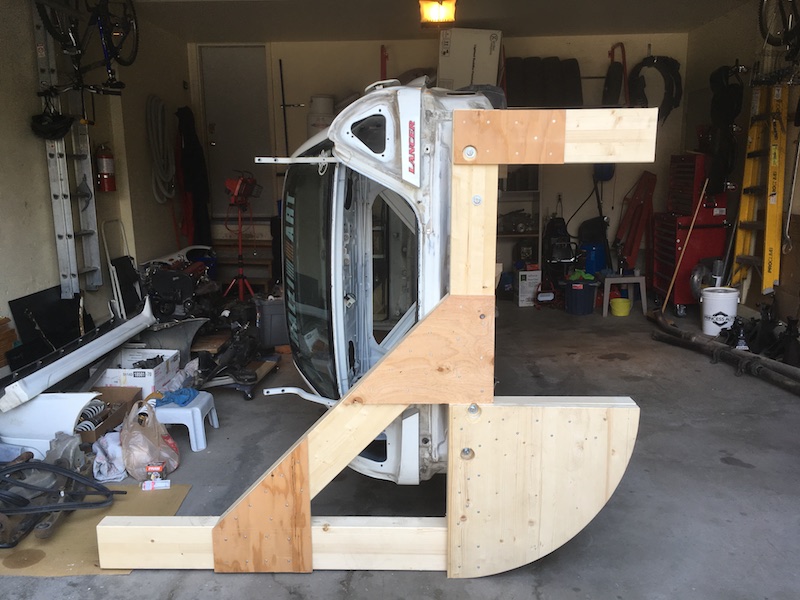
Building the wood frames of the DIY rotisserie.
So, the time had finally come. The car was as light as it would ever be, and the frames felt nice and stable, even after giving them a few shakes. I handed my camera over to my wife and had her start filming, just in case we needed to show the paramedics how I ended up under a car! But, lucky for me, the car flipped over without incident. In fact, I was amazed at how easily it turned over. It wasn’t the lightest thing to lift, but even by myself, I had no problem controlling it as it turned on its side. And just like that, the car was now all ready to start cleaning up.
For the past few days, I’ve been slowly working away at the underbody of the car. I started by stripping off all the underseal with a putty knife. I then started to sand off all the rust and paint with an angle grinder. Over the next couple weeks, the remaining rust and paint will be stripped off. This will be done with a combination of the angle grinder, sandpaper, wire brush, and even a chemical treatment on some hard-to-reach areas. After that, I will be moving on to the priming and painting. The current plan is to paint the underside white as well, to match the car. But knowing myself, I will likely debate this for the next few weeks, alternating between white and gray as my options.

A nice pile of underseal that had been scraped off.
The most important thing with rust removal is to ensure you actually remove all of it. Any rust left will continue to fester and eat away at the metal. Preventative action is always best with it too. And remember when importing your very own awesome beast of a car; check for rust! I wish I had at the time. I don’t know if it would have stopped me from buying the car, but I would have at least been prepared to deal with it earlier.
Stay tuned for updates on the car as I continue to work away at the underside. The coming weeks and months will see the completion of the underside, as well as a fresh paint and clear coat in the engine bay. I will also be posting up some info on my flat shaved trunk project too.
So there you have it, my experience tackling rust removal on my Mitsubishi Evo. If you're facing a similar situation with your own car, I hope my story has provided you with some inspiration and ideas on how to approach it. Remember, rust never sleeps, so it's essential to address it as soon as you can. Good luck with your rust removal journey, and keep your beloved car running for years to come.
Incredible job and great article! Best of luck and looking forward to updates on this project!
Hey thanks Jason! We’ve got lots of new updates in the pipeline, should get it up within this next week